Wednesday, 29 January 2014

OPatch failed with error code 73;UtilSession failed:oracle.crs:

While applying Oracle patch on RDBMS_HOME we received following error


[oracle@ppcmswgc-db01 ~]$ OPatch/opatch napply custom/server/ -local -oh $ORACLE_HOME -id 13440962
Invoking OPatch 11.2.0.1.7

Oracle Interim Patch Installer version 11.2.0.1.7
Copyright (c) 2011, Oracle Corporation.  All rights reserved.

UTIL session

Oracle Home       : /u02/app/oracle/product/11.2.0/db_1
Central Inventory : /u01/oraInventory
   from           : /etc/oraInst.loc
OPatch version    : 11.2.0.1.7
OUI version       : 11.2.0.3.0
Log file location : /u02/app/oracle/product/11.2.0/db_1/cfgtoollogs/opatch/opatch2014-01-29_10-42-40AM.log

Verifying environment and performing prerequisite checks...
UtilSession failed: Patch 13440962 requires component(s) that are not installed in OracleHome. These not-installed components are oracle.crs:11.2.0.3.0,
Log file location: /u02/app/oracle/product/11.2.0/db_1/cfgtoollogs/opatch/opatch2014-01-29_10-42-40AM.log

OPatch failed with error code 73

SOLUTION

Change the directory to "custom/server" and run opatch from there:


[oracle@ppcmswgc-db01 ~]$ ls -ltr
total 160536
drwxrwxrwx 5 oracle oinstall      4096 Dec 28  2011 13440962


[oracle@ppcmswgc-db01 ~]$ cd 13440962/custom/server
[oracle@ppcmswgc-db01 server]$ ls -tlr
total 4
drwxrwxrwx 5 oracle oinstall 4096 Dec 28  2011 13440962

[oracle@ppcmswgc-db01 ~]opatch napply -local -oh $ORACLE_HOME -id 13440962


Thursday, 6 June 2013

Oracle RACOne Node -- Changes in 11.2.0.2 onwards

1. Oracle Universal Installer (OUI) has a new option to select an Oracle RAC One Node Installation.
2. The DBCA is now capable of creating and configuring an Oracle RAC One Node database.
3. SRVCTL is capable of configuring and administering an Oracle RAC One database.
(In 11.2.0.1 the administration was performed using command line tools and scripts.). So Don't look for "raconeinit" or "omotion" utilities in $RDBMS_HOME/bin
3. Oracle Data Guard and the Oracle Data Guard Broker are Oracle RAC One Node aware.

Friday, 31 May 2013

clscfg.bin: error while loading shared libraries: libcap.so.1 : Error while executing the root.sh for Grid Infrastucture in one of the node

Received the following Error while executing the root.sh for Grid Infrastructure Installation in one of the node

OS - RHEL 6.2
DB - 11.2.0.3

[root@coltdb03 ~]# uname -a
Linux coltdb03.cms.colt 2.6.32-220.el6.x86_64 #1 SMP Wed Nov 9 08:03:13 EST 2011 x86_64 x86_64 x86_64 GNU/Linux

[root@coltdb03 ~]# /u01/app/11.2.0/grid/root.sh
Performing root user operation for Oracle 11g

The following environment variables are set as:
    ORACLE_OWNER= grid
    ORACLE_HOME=  /u01/app/11.2.0/grid

Enter the full pathname of the local bin directory: [/usr/local/bin]:
The contents of "dbhome" have not changed. No need to overwrite.
The contents of "oraenv" have not changed. No need to overwrite.
The contents of "coraenv" have not changed. No need to overwrite.

Entries will be added to the /etc/oratab file as needed by
Database Configuration Assistant when a database is created
Finished running generic part of root script.
Now product-specific root actions will be performed.
Using configuration parameter file: /u01/app/11.2.0/grid/crs/install/crsconfig_params
User ignored Prerequisites during installation
Failed to create keys in the OLR, rc = 127, Message:
  /u01/app/11.2.0/grid/bin/clscfg.bin: error while loading shared libraries: libcap.so.1: cannot open shared object file: No such file or directory

Failed to create keys in the OLR at /u01/app/11.2.0/grid/crs/install/crsconfig_lib.pm line 7497.
/u01/app/11.2.0/grid/perl/bin/perl -I/u01/app/11.2.0/grid/perl/lib -I/u01/app/11.2.0/grid/crs/install /u01/app/11.2.0/grid/crs/install/rootcrs.pl execution failed

Solution

Install the following rpms

[root@coltdb03 ~]# yum install libcap.x86_64
Loaded plugins: product-id, security, subscription-manager
Updating certificate-based repositories.
Setting up Install Process
Package libcap-2.16-5.5.el6.x86_64 already installed and latest version


[root@coltdb03 ~]# yum install compat-libcap1.x86_64


[root@coltdb03 ~]# /u01/app/11.2.0/grid/root.sh
Performing root user operation for Oracle 11g

The following environment variables are set as:
    ORACLE_OWNER= grid
    ORACLE_HOME=  /u01/app/11.2.0/grid

Enter the full pathname of the local bin directory: [/usr/local/bin]:
The contents of "dbhome" have not changed. No need to overwrite.
The contents of "oraenv" have not changed. No need to overwrite.
The contents of "coraenv" have not changed. No need to overwrite.

Entries will be added to the /etc/oratab file as needed by
Database Configuration Assistant when a database is created
Finished running generic part of root script.
Now product-specific root actions will be performed.
Using configuration parameter file: /u01/app/11.2.0/grid/crs/install/crsconfig_params
User ignored Prerequisites during installation
OLR initialization - successful
Adding Clusterware entries to upstart
CRS-4402: The CSS daemon was started in exclusive mode but found an active CSS daemon on node coltdb01, number 1, and is terminating
An active cluster was found during exclusive startup, restarting to join the cluster

Configure Oracle Grid Infrastructure for a Cluster ... succeeded


Tuesday, 26 February 2013

Creating ASM disks using udev in RHEL 6.2


For RHEL6 or Oracle Linux 6, Oracle will only provide ASMLib software and updates when configured Unbreakable Enterprise Kernel (UEK). Oracle will not provide ASMLib packages for kernels distributed by Red Hat as part of RHEL 6 or the Red Hat compatible kernel in Oracle Linux 6. ASMLib updates will be delivered via Unbreakable Linux Network(ULN) which is available to customers with Oracle Linux support. ULN works with both Oracle Linux or Red Hat Linux installations, but ASMlib usage will require replacing any Red Hat kernel with UEK

Therefore use Linux udev to create ASM disk in RHEL 6.2

Steps to create ASM disk using udev

1. Partition the given LUN using fdisk or parted. In our example we have created multiple partition on a single LUN.

Disk /dev/sda: 61.4 GB, 61440262144 bytes
64 heads, 32 sectors/track, 58594 cylinders
Units = cylinders of 2048 * 512 = 1048576 bytes
Sector size (logical/physical): 512 bytes / 512 bytes
I/O size (minimum/optimal): 512 bytes / 512 bytes
Disk identifier: 0x000b7104

   Device Boot      Start         End      Blocks   Id  System
/dev/sda1               1       10241    10486768   83  Linux
/dev/sda2           10242       20482    10486784   83  Linux


2. The device attributes used in the udev rules template are found by running the following
command on each device (here as an example, /dev/sda) and substituting the corresponding
values in the example below:

[root@coltdb01 ~]# scsi_id --page=0x83 --whitelisted --device=/dev/sda
3600c0ff000d7daf2c0588a5001000000

3. With this information, you can isolate the disk devices to be used by ASM to their own
directory (/dev/oracleasm/disks), and automatically change their ownership and access permission so that ASM can read them. Create a new file, /etc/udev/rules.d/99-asm.rules, with contents similar to the following


If you have multiple partitions on a single LUN, you can mention as below

vi 99-asm.rules

# What: oracle database: devices to be used by ASM
## Important: each rule must either be a single line or extend to multiple lines with backslashes.

KERNEL=="sda1", PROGRAM=="scsi_id --page=0x83 --whitelisted --device=/dev/%k", \
RESULT=="3600c0ff000d7daf2c0588a5001000000", \
SYMLINK+="oracleasm/disks/DSK1", OWNER="oracle", GROUP="dba", MODE="0660"

KERNEL=="sda2", PROGRAM=="scsi_id --page=0x83 --whitelisted --device=/dev/%k", \
RESULT=="3600c0ff000d7daf2c0588a5001000000", \
SYMLINK+="oracleasm/disks/DSK2", OWNER="oracle", GROUP="dba", MODE="0660"

If you have single partition on each LUN, you can mention as follow

vi 99-asm.rules

# What: oracle database: devices to be used by ASM
## Important: each rule must either be a single line or extend to multiple lines with backslashes.

KERNEL=="sd*", PROGRAM=="scsi_id --page=0x83 --whitelisted --device=/dev/%k", \
RESULT=="3600605b00162840001e285f91316df21", \
SYMLINK+="oracleasm/disks/DSK1", OWNER="oracle", GROUP="dba", MODE="0660"
KERNEL=="sd*", PROGRAM=="scsi_id --page=0x83 --whitelisted --device=/dev/%k", \
RESULT=="360080e50001c2c8600001a254eeb7a3d", \
SYMLINK+="oracleasm/disks/DSK2", OWNER="oracle", GROUP="dba", MODE="0660"

These rules will take effect after the next reboot.

4. You can see the disks created on node under /dev/oracleasm/disks

[root@coltdb01 disks]# cd /dev/oracleasm/disks
[root@coltdb01 disks]# ls -tlr
total 0
lrwxrwxrwx 1 root root 10 Feb 26 16:36 DSK2 -> ../../sda2
lrwxrwxrwx 1 root root 10 Feb 26 16:36 DSK1 -> ../../sda1

5. The disks created using udev are visible in the installation once you change your "Disk Discovery Path"


6. Occasionally, when reusing a LUN, ASM may detect a previous disk header and refuse to
reuse the disk. If that is the case, clear the header by writing 25 MB of nulls, and repartition
the LUN. For example:

# dd if=/dev/zero of=/dev/oracleasm/disks/DSK1 bs=1M count=25


Thursday, 25 October 2012

Configuring a Server with the Oracle Validated RPM


The fastest way to configure an Oracle Enterprise Linux server for an Oracle database installation is to run the Oracle Validated RPM.

Configuring YUM


A YUM server provides a repository for RPM packages and their associated metadata. This makes installing the packages and their dependencies straightforward. Oracle provides a public YUM server at http://public-yum.oracle.com, but its server provides only the packages you have already downloaded on the installation media. Subscribers to the Unbreakable Linux Network can access additional security updates and patches on top of the content available on the public YUM server. If you do not have access to the Unbreakable Linux Network or you do not wish to use the public YUM server, it is a simple enough process to configure your own from the installation media.

To Configure YUM using Proxy server


[root@coltdb01 ~]# cd /etc/yum.repos.d/
[root@coltdb01 yum.repos.d]# http_proxy=http://10.XX.XX.10:80
[root@coltdb01 yum.repos.d]# export http_proxy

For RHEL 5


[root@coltdb01 yum.repos.d]# wget http://public-yum.oracle.com/public-yum-el5.repo
--2012-10-25 16:25:53--  http://public-yum.oracle.com/public-yum-el5.repo
Connecting to 10.91.118.10:80... connected.
Proxy request sent, awaiting response... 200 OK
Length: 3974 (3.9K) [text/plain]
Saving to: `public-yum-el5.repo'

100%[===========================================================================================================================================================>] 3,974       --.-K/s   in 0.004s

2012-10-25 16:25:53 (1.04 MB/s) - `public-yum-el5.repo' saved [3974/3974]


[root@coltdb01 yum.repos.d]# yum install oracle-validated

For RHEL 6


[root@linux yum.repos.d]# wget http://public-yum.oracle.com/public-yum-ol6.repo
[root@linux yum.repos.d]# yum install oracle-rdbms-server-11gR2-preinstall


Once the Oracle Validated RPM installation completes, all the RPM packages and system configuration steps required for an Oracle Database 11g Release 2 RAC installation have also been completed. For example, the required user and groups have been created, and the necessary kernel parameters have been set.You can find the installed packages listed in /var/log/yum.log


Thursday, 4 October 2012

Setup of the new Redundant Interconnect feature in Oracle 11gR2 (HAIP)


With the introduction of Oracle 11gR2, the need for IP failover using tools such as bonding are no longer required for the private interconnect. The grid infrastructure within 11.2.0.2 supports IP failover natively using a new feature introduced known as 'redundant interconnect'. Oracle uses its ora.cluster_interconnect.haip resource in order for communication with Oracle RAC, Oracle ASM, and other related services.  The HAIP (Highly Available Internet Protocol) has the ability to activate a maximum of four private interconnect connections. These private network adapters can be configured during the initial install process of Oracle Grid or after the installation process using the oifcfg utility.

Oracle Grid currently creates an alias IP (as known as virtual private IP) on your private network adapters using the 169.254.*.* subnet for the HAIP. However, if that subnet range is already in use, Oracle Grid will not attempt to use it. The purpose of HAIP is to load balance across all active interconnect interfaces, and failover to other available interfaces if one of the existing private adapters becomes unresponsive.

It is important to note, that when adding additional HAIP addresses (maximum of four) after the installation of Oracle Grid  a restart of your Oracle Grid will be required to make these new HAIP addresses active


The example below shows a step-by-step on how to enable redundant interconnect using HAIP on a existing Oracle 11gR2 Grid Infrastructure installation.


Pre-Installation

I have added a new private physical interface on both the nodes (eth4). Oracle currently does not support having different network interfaces for each node in the cluster. The best practice is to configure all nodes with the same network interface for each public subnet and the same network interface for each private subnet.

Edit the /etc/sysconfig/network-scripts/ifcfg-eth4 on both the nodes.

[root@coltdb01 bin]# ./oifcfg getif
eth0  192.168.1.0  global  cluster_interconnect
eth1  10.91.119.0  global  public

[oracle@coltdb01 bin]$ ./oifcfg iflist
eth0  192.168.1.0
eth0  169.254.0.0
eth4  192.168.1.0
eth1  10.91.119.0


You can check the interconnect details in the database 

SQL> select * from gv$cluster_interconnects;

   INST_ID NAME            IP_ADDRESS       IS_ SOURCE
---------- --------------- ---------------- --- -------------------------------
         1 eth0:1          169.254.226.34   NO
         3 eth0:1          169.254.151.242  NO

SQL>  select * from v$cluster_interconnects;

NAME            IP_ADDRESS       IS_ SOURCE
--------------- ---------------- --- -------------------------------
eth0:1          169.254.226.34   NO


Using "oifcfg setif" set an interface type (cluster interconnect) for an interface.

oifcfg setif -global eth4/192.168.1.0:cluster_interconnect

Once Done, You must restart Oracle Clusterware on all members of the cluster when you make global changes.


Post-Installation

[root@coltdb01 bin]# ./oifcfg getif
eth0  192.168.1.0  global  cluster_interconnect
eth1  10.91.119.0  global  public
eth4  192.168.1.0  global  cluster_interconnect


[root@coltdb01 bin]# ./oifcfg iflist -p -n
eth0  192.168.1.0  PRIVATE  255.255.255.0
eth0  169.254.0.0  UNKNOWN  255.255.128.0
eth4  192.168.1.0  PRIVATE  255.255.255.0
eth4  169.254.128.0  UNKNOWN  255.255.128.0
eth1  10.91.119.0  PRIVATE  255.255.255.0

SQL> select * from gv$cluster_interconnects;

   INST_ID NAME            IP_ADDRESS       IS_ SOURCE
---------- --------------- ---------------- --- -------------------------------
         3 eth0:1          169.254.79.75    NO
         3 eth4:1          169.254.210.156  NO
         1 eth0:1          169.254.29.152   NO
         1 eth4:1          169.254.206.96   NO


SQL> select * from v$cluster_interconnects;

NAME            IP_ADDRESS       IS_ SOURCE
--------------- ---------------- --- -------------------------------
eth0:1          169.254.29.152   NO
eth4:1          169.254.206.96   NO


Thursday, 20 September 2012

Grid Infrastructure Installation - Implementing an Advanced Installation for Automatic Configuration based on Grid Naming Service (GNS)


Whether you’re using GNS or a manual IP configuration, the availability of DNS is required to support the cluster configuration. If using GNS, a DHCP server configuration is also required. In this post I will showing you how to configure both the DNS and DHCP on Windows Server

Configuring DNS


It is necessary to create a delegated subdomain (e.g., grid1.example.com), which is managed by the Grid Naming Service (GNS). In Windows you can create the subdomain as follows

1. Right click on the domain name (e.g., example.com) and select the "New Delegation.."


2. Provide the Subdomain name as grid1 ( e.g., grid1.example.com) and click Next


3. Note that GNS is a cluster resource that requires its own VIP. The VIP is allocated within DNS. At any one time, GNS will only be active on one node in the cluster. If this node is shutdown, then Oracle Clusterware will automatically relocate the GNS VIP to one of the remaining nodes in the cluster.

Here the host name is provided as - cluster1-gns.grid1.example.com and the VIP IP as 10.91.119.184


4. Once you click "OK" you will get a confirmation screen as below.


Configuring DHCP


For our installation, we have configured DHCP to assign a range of 10 addresses that DHCP can allocate (10.91.119.185 to 10.91.119.195).


Configuration on the Cluster Nodes


On each node in the cluster, the /etc/resolv.conf is configured as follows:

search example.com grid1.example.com
nameserver 10.91.119.134
options attempts:2
options timeout:1

and you /etc/hosts will have entries only for you Private IPs


root@coltdb01 grid]# cat /etc/hosts
# Do not remove the following line, or various programs
# that require network functionality will fail.
127.0.0.1               localhost.localdomain localhost
::1             localhost6.localdomain6 localhost6
192.168.1.1   coltdb01-priv.example.com coltdb01-priv
192.168.1.2   coltdb02-priv.example.com coltdb02-priv

Testing the Setup

The cluvfy utility has been enhanced to test GNS before you go through the installation process and finding out it all failed. Before you install, you invoke runcluvfy comp gns -precrsinst as in this example:

[oracle@coltdb01 grid]$ ./runcluvfy.sh comp gns -precrsinst -domain grid1.example.com -vip 10.91.119.185 -verbose -n coltdb01

WARNING:
Could not access or create trace file path "/tmp/bootstrap/cv/log". Trace information could not be collected


Verifying GNS integrity

Checking GNS integrity...
Checking if the GNS subdomain name is valid...
The GNS subdomain name "grid1.example.com" is a valid domain name
Checking if the GNS VIP is a valid address...
GNS VIP "10.91.119.185" resolves to a valid IP address
Checking the status of GNS VIP...

GNS integrity check passed

Verification of GNS integrity was successful.

Setting up the Grid Plug and Play Information Page


As the oracle user, start the OUI using runInstaller.sh command and choose the Advance Installation option
In the Grid Plug and Play Information Page provide the following information

1. Provide the cluster name,scan name, GNS subdomain name and the GNS VIP address.


2. Add the Cluster Public hostname and Vitual Hostname should be AUTO


 3. At the End of the installation, you will asked to execute root.sh on both the nodes as root user.


4. After the successful execution of root.sh on both the nodes, you can see SCAN IPs and VIPs are dynamically assigned to both the nodes.

Post Validation


[oracle@coltdb01 bin]$ ./cluvfy comp gns -postcrsinst -verbose

Verifying GNS integrity

Checking GNS integrity...
Checking if the GNS subdomain name is valid...
The GNS subdomain name "grid1.example.com" is a valid domain name
Checking if the GNS VIP belongs to same subnet as the public network...
Public network subnets "10.91.119.0" match with the GNS VIP "10.91.119.0"
Checking if the GNS VIP is a valid address...
GNS VIP "10.91.119.184" resolves to a valid IP address
Checking the status of GNS VIP...
Checking if FDQN names for domain "grid1.example.com" are reachable

GNS resolved IP addresses are reachable

GNS resolved IP addresses are reachable

GNS resolved IP addresses are reachable

GNS resolved IP addresses are reachable

GNS resolved IP addresses are reachable
Checking status of GNS resource...
  Node          Running?                  Enabled?
  ------------  ------------------------  ------------------------
  coltdb01      yes                       yes
  coltdb02      no                        yes

GNS resource configuration check passed
Checking status of GNS VIP resource...
  Node          Running?                  Enabled?
  ------------  ------------------------  ------------------------
  coltdb01      yes                       yes
  coltdb02      no                        yes

GNS VIP resource configuration check passed.

GNS integrity check passed

Verification of GNS integrity was successful.


[oracle@coltdb01 bin]$ ./srvctl config gns -l
Name               Type Value
cluster1-scan      A    10.91.119.186
cluster1-scan      A    10.91.119.187
cluster1-scan      A    10.91.119.188
cluster1-scan1-vip A    10.91.119.186
cluster1-scan2-vip A    10.91.119.187
cluster1-scan3-vip A    10.91.119.188
coltdb01-vip       A    10.91.119.185
coltdb02-vip       A    10.91.119.189


As you can see, the GNS daemon will allocate three IP addresses from the range of addresses offered by the DHCP server. The IP addresses are records in DNS that resolve to the SCAN name in a round robin fashion

Adding Nodes

Executing the following command on one of the existing nodes in $GRID_HOME/oui/bin was enough to add a node to a cluster with GNS enabled:

[oracle@london1 bin]$ ./addNode.sh  "CLUSTER_NEW_NODES={newNodePublicIP}"


Thursday, 23 August 2012

"Oracle Grid Infrastructure is not configured properly. ASMCA needs Oracle Grid Infrastructure to configure ASM" error while creating ASM instance using ASMCA


While creating a ASM instance for standalone server using "asmca", we received the following error.


Intially the Oracle Grid Infrastructure was installed using following option "Install Oracle Grid Infrastructure software Only"

Solution

Execute the "root.sh" again as root user. "root.sh" can be found on grid home.

------------------------
[root@coltdb08 grid]# ./opt/11.2.0/grid/root.sh
Performing root user operation for Oracle 11g

The following environment variables are set as:
    ORACLE_OWNER= oracle
    ORACLE_HOME=  /opt/11.2.0/grid

Enter the full pathname of the local bin directory: [/usr/local/bin]:
The contents of "dbhome" have not changed. No need to overwrite.
The contents of "oraenv" have not changed. No need to overwrite.
The contents of "coraenv" have not changed. No need to overwrite.

Entries will be added to the /etc/oratab file as needed by
Database Configuration Assistant when a database is created
Finished running generic part of root script.
Now product-specific root actions will be performed.

To configure Grid Infrastructure for a Stand-Alone Server run the following command as the root user:
/opt/11.2.0/grid/perl/bin/perl -I/opt/11.2.0/grid/perl/lib -I/opt/11.2.0/grid/crs/install /opt/11.2.0/grid/crs/install/roothas.pl


To configure Grid Infrastructure for a Cluster execute the following command:
/opt/11.2.0/grid/crs/config/config.sh
This command launches the Grid Infrastructure Configuration Wizard. The wizard also supports silent operation, and the parameters can be passed through the response file that is available in the installation media.

---------------------

You can see there is separate script for creating Grid Infrastructure for stand-alone server. Execute the script as root user

--------------------
[root@coltdb08 grid]# /opt/11.2.0/grid/perl/bin/perl -I/opt/11.2.0/grid/perl/lib -I/opt/11.2.0/grid/crs/install /opt/11.2.0/grid/crs/install/roothas.pl
Using configuration parameter file: /opt/11.2.0/grid/crs/install/crsconfig_params
Creating trace directory
User ignored Prerequisites during installation
LOCAL ADD MODE
Creating OCR keys for user 'oracle', privgrp 'oinstall'..
Operation successful.
LOCAL ONLY MODE
Successfully accumulated necessary OCR keys.
Creating OCR keys for user 'root', privgrp 'root'..
Operation successful.
CRS-4664: Node coltdb08 successfully pinned.
Adding Clusterware entries to inittab

coltdb08     2012/08/23 16:56:53     /opt/11.2.0/grid/cdata/coltdb08/backup_20120823_165653.olr
Successfully configured Oracle Grid Infrastructure for a Standalone Server
------------


Now try to create the ASM instance using "asmca", it will successfully create the ASM instance.


Thursday, 9 August 2012

Error: ORA-12545 while trying to connect using SCAN from the Oracle Client in Oracle 11gR2


While trying to connect from Oracle Client using the SCAN IP we are receiving the Error.

Enter user-name: system/manager@coltdb01-scan.test.exp:1521/sendb.test.exp

ERROR:
ORA-12545: Connect failed because target host or object does not exist

Steps to troubleshoot

1. check whether you are able to "ping" and "nslookup" the SCAN name from Client host. nslookup should resolve the SCAN ips

2. Check whether you have set your REMOTE_LISTENER correctly. In 11gR2 it should point to your SCAN name
 
    remote_listener                      string      coltdb01-scan:1521

3. Check your LOCAL_LISTENER parameter. It is very important, that you point your VIP correctly
 
    local_listener         (DESCRIPTION=(ADDRESS_LIST=(AD
                           DRESS=(PROTOCOL=TCP)(HOST=colt
                           db02-vip.test.exp)(PORT=1521))
                           ))


     Try to connect using the VIP name and  VIP IP address from the client instead of SCAN. If you are not able to connect using the VIP name and able to connect using the VIP IP address,
     make sure to change the local_listener value as below

    local_listener           (DESCRIPTION=(ADDRESS_LIST=(AD
                           DRESS=(PROTOCOL=TCP)(HOST=10.9
                           1.119.151)(PORT=1521))))

4. Make sure all your listener are online using following commands

   [oracle@coltdb01 admin]$ $GRID_HOME/bin/srvctl config scan
   [oracle@coltdb01 admin]$ $GRID_HOME/bin/srvctl config scan_listener
   [oracle@coltdb01 admin]$ $GRID_HOME/bin/crsctl stat res -w "TYPE = ora.scan_listener.type"
   [oracle@coltdb01 admin]$$GRID_HOME/bin/lsnrctl status LISTENER_SCAN1  ( Make sure you set the ORACLE_HOME env variable to GRID_HOME)
   [oracle@coltdb01 admin]$$GRID_HOME/bin/lsnrctl service LISTENER_SCAN1


My issue was fixed when I modified my local_listener to include the VIP IP address because the Oracle client was not able resolve the VIP name


Enter user-name: system/manager@coltdb01-scan.test.exp:1521/sendb.test.exp

Connected to:
Oracle Database 11g Enterprise Edition Release 11.2.0.3.0 - 64bit Production
With the Partitioning, Real Application Clusters, Automatic Storage Management,
OLAP,
Data Mining and Real Application Testing options


The reason is that the SCAN listener is only a front to the local listeners on each node. Once the SCAN interface determines what node to send you to it will basically change the connect string to the connect string of the local listener. The value of the local listener host for some reasons get from "local_listener" database initialisation parameter. By default you can have VIP adresses without domain name. If your DNS does not resolve nodes shortnames (which is quite common) SCAN does not know where is the node hosts and raise "ORA-12545: Connect failed because target host or object does not exist".

Tuesday, 7 August 2012

Moving OCR and Voting Disk from Raw Devices to ASM Disk

After upgrade from 10.2 to 11.3, you can use the following steps to move the ocr and Voting disk from Raw devices to ASM Disk.

1) Check the current OCR and Voting disk file

     OCR file status


     [oracle@coltdb01 ~]$ ocrcheck
     Status of Oracle Cluster Registry is as follows :
         Version                  :          3
         Total space (kbytes)     :     240480
         Used space (kbytes)      :       6520
         Available space (kbytes) :     233960
         ID                       : 1362593683
         Device/File Name         : /dev/raw/raw1
                                    Device/File integrity check succeeded
         Device/File Name         : /dev/raw/raw2
                                    Device/File integrity check succeeded

                                    Device/File not configured

                                    Device/File not configured

                                    Device/File not configured

         Cluster registry integrity check succeeded

         Logical corruption check bypassed due to non-privileged user

      Voting Disk status


       [oracle@coltdb01 ~]$ crsctl query css votedisk
       ##  STATE    File Universal Id                File Name Disk group
        --  -----    -----------------                --------- ---------
        1. ONLINE   2a87ecd7fedadfe9ff06de264773036e (/dev/raw/raw3) []
        2. ONLINE   2ca3947acf51ffa2bf271bf037bc8779 (/dev/raw/raw4) []
        3. ONLINE   1a72a3dca25eefabff869f8f5a661af3 (/dev/raw/raw5) []

2) Create a new ASM diskgroup for OCR and Voting disk.(you can use the existing disk also)

    SQL> create diskgroup CRS external redundancy DISK 'ORCL:VOL5';

    * Once you have created the Partition on node 1, execute the "partprobe" command on both the nodes
          
   * Execute "Oracleasm scandisks"  to check for the new ASM disk created. Verify using  "oracleasm listdisks" on node 2
   
   * Check on the node 2 whether the diskgroup created is mounted, otherwise mount it using
        SQL> alter diskgroup CRS MOUNT;

3) Change the compatible version of the asm diskgroup to 11.2

   SQL> select name,COMPATIBILITY,DATABASE_COMPATIBILITY from v$asm_diskgroup;

          NAME       COMPATIBILITY        DATABASE_COMPATIBILI
          ---------- -------------------- --------------------
          DATA         10.1.0.0.0           10.1.0.0.0
          FRA          10.1.0.0.0           10.1.0.0.0
          CRS          10.1.0.0.0           10.1.0.0.0

     SQL> alter diskgroup DATA set attribute 'compatible.asm'='11.2';

           Diskgroup altered.

     SQL> alter diskgroup FRA set attribute 'compatible.asm'='11.2';

          Diskgroup altered.

      SQL> alter diskgroup CRS set attribute 'compatible.asm'='11.2';

          Diskgroup altered.

       SQL> alter diskgroup DATA set attribute 'compatible.rdbms'='11.2';

          Diskgroup altered.

        SQL> alter diskgroup FRA set attribute 'compatible.rdbms'='11.2';

        Diskgroup altered.

        SQL> alter diskgroup CRS set attribute 'compatible.rdbms'='11.2';

        Diskgroup altered.

       SQL> select name,COMPATIBILITY,DATABASE_COMPATIBILITY from v$asm_diskgroup;

           NAME       COMPATIBILITY        DATABASE_COMPATIBILI
            ---------- -------------------- --------------------
           DATA         11.2.0.0.0           11.2.0.0.0
           FRA          11.2.0.0.0           11.2.0.0.0
           CRS          11.2.0.0.0           11.2.0.0.0

4) Replace the existing ocr file with the ASM disk
   
       [root@coltdb01 bin]# ./ocrconfig -replace /dev/raw/raw1 -replacement +CRS
   [root@coltdb01 bin]# ./ocrconfig -replace /dev/raw/raw2 -replacement +DATA

       Check the ocr status using ocrcheck
 
        [oracle@coltdb01 grid]$ ocrcheck
        Status of Oracle Cluster Registry is as follows :
         Version                  :          3
         Total space (kbytes)     :     240480
         Used space (kbytes)      :       6516
         Available space (kbytes) :     233964
         ID                       : 1362593683
         Device/File Name         :       +CRS
                                    Device/File integrity check succeeded
         Device/File Name         :      +DATA
                                    Device/File integrity check succeeded

                                    Device/File not configured

                                    Device/File not configured

                                    Device/File not configured

         Cluster registry integrity check succeeded

         Logical corruption check bypassed due to non-privileged user

5) Replace the voting disk as below
 
    [oracle@coltdb01 grid]$ crsctl replace votedisk +CRS
     CRS-4256: Updating the profile
     Successful addition of voting disk 8a10ad3375914f43bfc301334a9f6c2c.
     Successful deletion of voting disk 2a87ecd7fedadfe9ff06de264773036e.
     Successful deletion of voting disk 2ca3947acf51ffa2bf271bf037bc8779.
     Successful deletion of voting disk 1a72a3dca25eefabff869f8f5a661af3.
     Successfully replaced voting disk group with +CRS.
    CRS-4256: Updating the profile
    CRS-4266: Voting file(s) successfully replaced

     Check the Voting disk file
     [oracle@coltdb01 grid]$ crsctl query css votedisk
     ##  STATE    File Universal Id                File Name Disk group
     --  -----    -----------------                --------- ---------
      1. ONLINE   8a10ad3375914f43bfc301334a9f6c2c (ORCL:VOL5) [CRS]

6)  You can also use the following command to check ocr status
   
      cluvfy comp ocr -n all -verbose


Tuesday, 24 July 2012

Connected to an idle instance..DB is up and running


[oracle@coltdb01 bin]$ ps -ef | grep pmon
oracle    6098     1  0 Jul18 ?        00:00:08 asm_pmon_+ASM1
oracle    8280     1  0 Jul23 ?        00:00:01 ora_pmon_sendb1
oracle   28280 27300  0 18:12 pts/1    00:00:00 grep pmon

[oracle@coltdb01 ~]$ export ORACLE_HOME=/u03/oracle/product/11.2.0/db_1/
[oracle@coltdb01 ~]$ export ORACLE_SID=sendb1

[oracle@coltdb01 bin]$ pwd
/u03/oracle/product/11.2.0/db_1/bin
[oracle@coltdb01 bin]$ ./sqlplus

SQL*Plus: Release 11.2.0.3.0 Production on Tue Jul 24 18:13:48 2012

Copyright (c) 1982, 2011, Oracle.  All rights reserved.

Enter user-name: / as sysdba
Connected to an idle instance.


I was wondering why I was not able to connect to the instance, which is up and running. After some time I could figure out that, the issue was with the backslash(/) in Oracle Home environment variable. After I removed the backslash(/) I am able to connect to the instance

[oracle@coltdb01 bin]$ export ORACLE_HOME=/u03/oracle/product/11.2.0/db_1
[oracle@coltdb01 bin]$ export ORACLE_SID=sendb1
[oracle@coltdb01 bin]$ pwd
/u03/oracle/product/11.2.0/db_1/bin
[oracle@coltdb01 bin]$ ./sqlplus

SQL*Plus: Release 11.2.0.3.0 Production on Tue Jul 24 18:17:09 2012

Copyright (c) 1982, 2011, Oracle.  All rights reserved.

Enter user-name: / as sysdba

Connected to:
Oracle Database 11g Enterprise Edition Release 11.2.0.3.0 - 64bit Production
With the Partitioning, Real Application Clusters, Automatic Storage Management, OLAP,
Data Mining and Real Application Testing options

SQL>


Monday, 23 July 2012

11gR2 RDBMS software Installation and Database Upgrade from 10.2 to 11.3 using DBUA

Please find the high level steps to upgrade your 10.2 RAC database to 11.3 using DBUA. I would recommend using DBUA for RAC databases upgrade, as dbua is RAC aware and performs various RAC related tasks internally.

1) Before we start the upgrade, use cluvfy to verify whether the nodes are ready for upgrade.
 
    From the 11gR2 software binaries location execute -->
    cluvfy stage -pre dbinst -n coltdb01,coltdb02 -d $ORACLE_HOME -verbose

2)  Once the cluvfy succeed for all the nodes, run the ./runInstaller to install the database software.

3) Choose "Install database software only" option.


4) As you can see, the nodes would be displayed and select all the nodes, where the software should be      installed.

5) Specify the Oracle Base and Oracle software location


6) Oracle will check for the Pre-requisite to install the software, make sure all the pre-requisite are met


7) Before the installation starts, the Summary is provided, .Click Install to start the installation.


 8) At the end of the installation, you will be asked to execute the root.sh on all the nodes.


Once you have successfully install the database software, now you can upgrade your 10.2 RAC database using DBUA.


 Things to do before you start your upgrade


1. Take a Full Database Backup


2. Take the count of invalid Objects after executing the utlrp.sql script.


3. Execute OH_11G/rdbms/admin/utlu112i.sql, to identify the Pre-upgrade task to be done on the database.
    
    SQL> @/u03/oracle/product/11.2.0/db_1/rdbms/admin/utlu112i.sql
    Oracle Database 11.2 Pre-Upgrade Information Tool 07-17-2012 15:36:09
    Script Version: 11.2.0.3.0 Build: 001
.
    **********************************************************************
    Database:
   **********************************************************************
   --> name:          SENDB
   --> version:       10.2.0.5.0
   --> compatible:    10.2.0.5.0
   --> blocksize:     8192
   --> platform:      Linux x86 64-bit
  --> timezone file: V4
.
  **********************************************************************
  Components: [The following database components will be upgraded or installed]
  **********************************************************************
  --> Oracle Catalog Views         [upgrade]  VALID
  --> Oracle Packages and Types    [upgrade]  VALID
  --> JServer JAVA Virtual Machine [upgrade]  VALID
  --> Oracle XDK for Java          [upgrade]  VALID
  --> Real Application Clusters    [upgrade]  VALID
  --> Oracle Workspace Manager     [upgrade]  VALID
  --> OLAP Analytic Workspace      [upgrade]  VALID
  --> OLAP Catalog                 [upgrade]  VALID
  --> EM Repository                [upgrade]  VALID
  --> Oracle Text                  [upgrade]  VALID
  --> Oracle XML Database          [upgrade]  VALID
  --> Oracle Java Packages         [upgrade]  VALID
  --> Oracle interMedia            [upgrade]  VALID
  --> Spatial                      [upgrade]  VALID
  --> Data Mining                  [upgrade]  VALID
  --> Expression Filter            [upgrade]  VALID
  --> Rule Manager                 [upgrade]  VALID
  --> Oracle OLAP API              [upgrade]  VALID


3. Fix  the component if they are not valid.


Steps to upgrade the Database using DBUA

1) Execute the dbua from 11g R2 Oracle Home.
    [oracle@coltdb01 bin]$ pwd
    /u03/oracle/product/11.2.0/db_1/bin
    [oracle@coltdb01 bin]$ ./dbua


2) DBUA will list the databases mentioned in the Oratab. Select the correct db which you require to upgrade


3) You will receive a pop-up asking for the confirmation. Click Yes, if you have done all the pre- requisite


4) Provide the degree of Parallelism to recompile the invalid objects and also turn off the archiving mode    while upgrade. The DBUA will automatically turn on the archive mode after the upgrade.


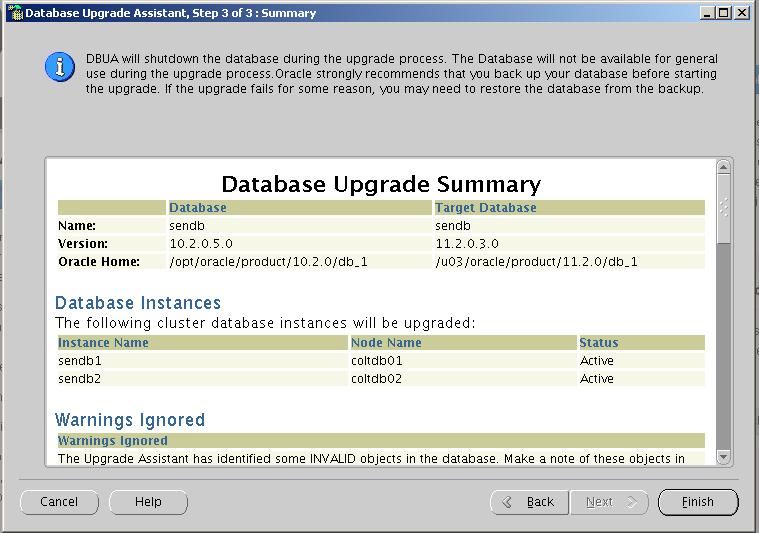
5) At the end, dbua provides a Database upgrade Summary Report. Click Finish to start the upgrade.


6)  The DBUA upgrades all the components


7) At the End it provides you the Upgrade Results Summary. You can review, if there are any errors.


Post upgrade Validation

1) Execute utlrp.sql to compile the invalid objects and check for the count. It should be same or less than the earlier count.

2) Execute the OH_11G/rdbms/admin/utlu112s.sql to check the upgrade status of all the components.
    Also you can check the Total Upgrade Time taken at the end of the report.


3) Gather the stats for system and fixed objects.


4) Execute the  following command to check the status of the database
  [oracle@coltdb01 bin]$ ./srvctl config database -d sendb
   Database unique name: sendb
   Database name:
   Oracle home: /u03/oracle/product/11.2.0/db_1
   Oracle user: oracle
   Spfile: +DATA/sendb/spfilesendb.ora
   Domain: cms.colt
   Start options: open
   Stop options: immediate
   Database role: PRIMARY
   Management policy: AUTOMATIC
   Server pools: sendb
   Database instances: sendb1,sendb2
   Disk Groups: DATA,FRA
   Mount point paths:
   Services:
   Type: RAC
   Database is administrator managed


5)  Take a full backup of the database


6) If you have tested your application thoroughly with oracle 11gR2, you can modify your compatible parameter. Because once you have modified your compatible parameter to 11.2, you cannot downgrade your database using normal method. only option is yo restore your database using the backup taken.


Time taken to upgrade the database does not mainly depend on your size of the database. It depends on the number of component you have installed along with the software.